Adding a TS-64 as a CTCSS Decoder to the Alinco DR-XX5 radio
Glen Roe, WA6MHA
Node 5610, K6VGG
June 25, 2005
Adding a TS-64 as a CTCSS Decoder to the Alnico DR-235 radio.
I needed to replace the 5610 IRLP Node radio that was a modified Midland 13509 with a newer radio.
The radio of choice is an Alinco DR-235. This radio series is almost Plug and Play. Don wb5eku, obtained
the pre made cables I needed from PLUG n PLAY CABLES (ke6pcv). It was Don that got me into IRLP several
years ago so I went with his advice on the cables. They worked as promised and the Alinco was Plug and Play
on IRLP, well almost!
The cable set worked great right off. The Radio worked great right off, except that the COS circuit has a delay of
500 ms after the CTCSS tone drops. This allowed several beep tones on the repeater, k6vgg, to get through on
IRLP. This is something that is frowned upon and should not happen if at all possible. There is nothing that could
be done at the repeater to remedy this. A little research on the Internet confirmed that both statements above are
true. I had to cut the delay time in the COS circuit in the Alinco! I found a lot of references to the long COS delay,
but no fixes. The following is my answer to this condition. I only use the decode function on the TS-64!
It would help a lot to have a copy of the Alinco manuals on hand. The PDF files are on the Alnico site. Look over
the pictures I have taken of my modification.
Remove all power from the radio! Set the CTCSS decode switches (or jumpers) to the desired decode tone.
Solder a jumper across JP7 on the TS-64.
Turn the radio upside down and remove the 4 screws that hold the cover on and remove the cover. The radio should
be upside down with the DB-9 to the rear. You will see IC-115 to the left (7808) with the leads pointing to the rear.
You will see connector CN107 (11 pins) to the front.
Plug in the cable connector that came with the TS-64 into the TS-64. Mount the TS-64 with the double sided tape to
the square silver shield in front of CN105 with the TS-64 connector to the right.
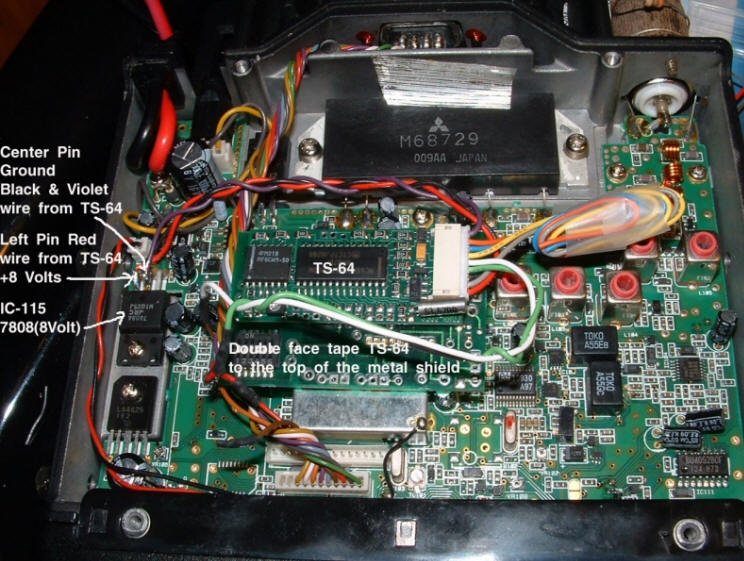
Now you can cut the needed wires to length. You may want to disconnect the TS-64 cable connector to strip and
solder the wires. The Black, Violet, and Red wire will all be going to IC115. The Black and Violet wire should be
soldered to the center lead of IC115 (Ground) The Red wire should be soldered to the left lead on IC115(+8 Volts).
I pre tinned all the leads to be soldered. I twisted the Black and Violet together before tinning. Make sure nothing
was shorted in this step.
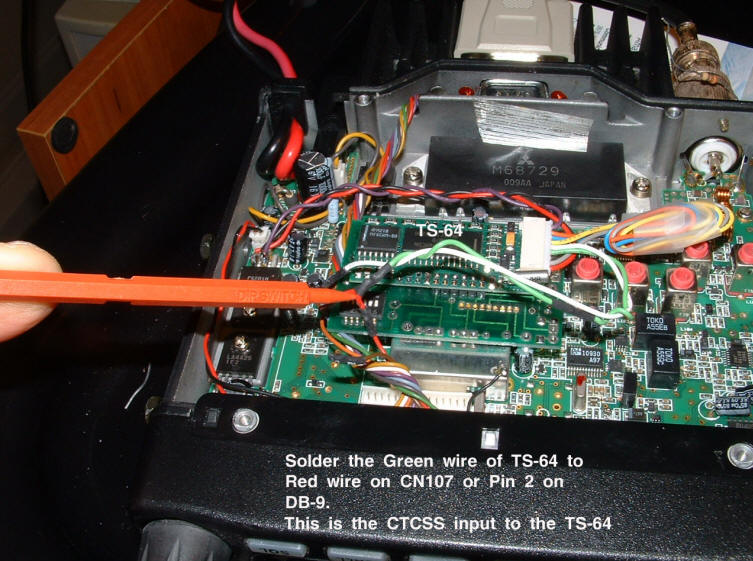
Next I soldered the Green wire from the TS-64 (CTCSS tone in) to the Red wire on CN107. The way I did this was to
cut the Red wire and extend both leads with scrap wire from the TS-64. I then was able so use shrink tubing to insulate
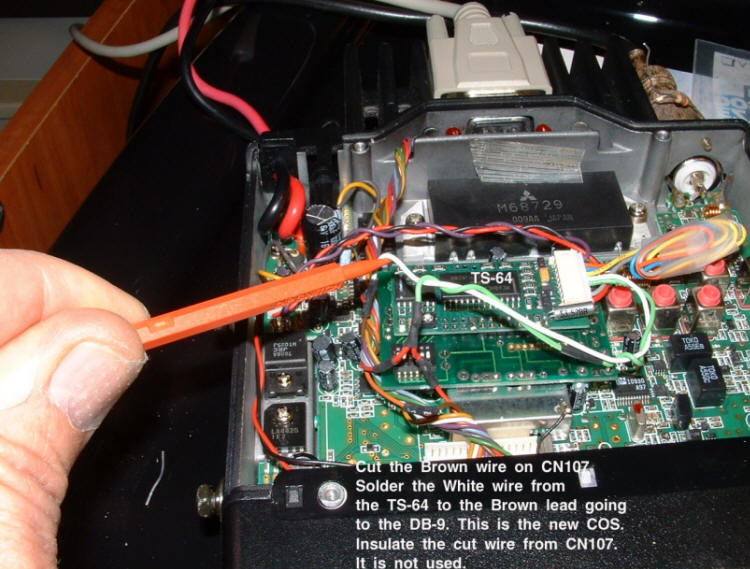
the wires. I allowed the Red wire on CN107 to continue to the rear DB-9 for future use. I then cut the Brown wire on
CN107 and connected the White wire from the TS-64 to the lead going to the rear DB-9. This is the new COS (150ms)!
I used shrink tubing on all wires and left the Brown wire stub from CN105 free. This is the COS from the Alinco decoder
and will not be used anymore (500ms).
Check all your solder joints and double check you work. Shake out any loose debris. Test your radio and button it up.
It seems possible all this could have been done in an external metal box with DB-9 connectors for in and out.
External regulated voltage would have to be provided or exchanged for an unused function on one of the pins on the
rear mounted DB-9. For simplicity of hardware and shielding, I chose to keep it all in the radio.
My next task will be to add a software (txfan) or hardware fan switch to the radio. The tx fan script was written by Jim
kd6hwc on node 3598. The PTT line on the DB-9 is pin 7 and the color is Violet.
Enjoy,
Glen
WA6MHA
|
Cables for other radios and or kits are available on special
request,
For Ordering information please contact Marshall, ke6pcv via email at: ke6pcv@cal-net.org PLUG n PLAY CABLES |
Copyright 2007 IRLP Cables Web Design & Host
Last Updated
April 17, 2007
Author ke6pcv@cal-net.org